こんばんは。
虫(蛾?かどうかもわからん)が家に入ってきて怖いです。
今回はタイトル通りMaterial Componentsのバージョンアップをして見る話です。
なぜアップデートしようとしたのか
A. Snackbarの位置をFloating Action Buttonの上に表示させたかったから。
Snackbarsのガイドラインの
Snackbars and floating action buttons (FABs)
でFABの上に表示させるのが正しいらしい。
それで真似ようと思ったのですが、古いのかsetAnchorView(どのViewの上に表示させるか?)が見つからなかったのでアップデートしようというのが理由。
ところで最新バージョンはどこで知れるのか?
これ?
https://github.com/material-components/material-components-android/releases
作成日時では1.1.0-alpha08が最新ですので入れてみようと思います。
最悪GitHubのちから?を借りて戻せばいいので挑戦です。
build.gradleを書き換える
1
2
|
implementation 'com.google.android.material:material:1.1.0-alpha08'
|
##出会った問題
###レイアウトのエラー
下の方に書いてあった。
1
| Caused by: java.lang.IllegalArgumentException: The style on this component requires your app theme to be Theme.MaterialComponents (or a descendant).
|
調べるとテーマがTheme.MaterialComponents系を使わないとだめだよ!ってことらしいです。
これを解決する方法は2つ。
解決策その1:レイアウト(xml)ファイルで親のレイアウトの中にandroid:theme="@style/Theme.MaterialComponents"を書き足す。
こんな感じに
1
2
3
4
5
6
7
8
9
10
11
12
13
14
15
16
17
18
19
20
21
| <?xml version="1.0" encoding="utf-8"?>
<LinearLayout xmlns:android="http://schemas.android.com/apk/res/android"
xmlns:app="http://schemas.android.com/apk/res-auto"
xmlns:tools="http://schemas.android.com/tools"
android:layout_width="match_parent"
android:layout_height="match_parent"
android:theme="@style/Theme.MaterialComponents">
<com.google.android.material.textfield.TextInputLayout
android:id="@+id/name_TextInputLayout"
style="@style/Widget.MaterialComponents.TextInputLayout.OutlinedBox"
android:layout_width="match_parent"
android:layout_height="wrap_content">
<EditText
android:id="@+id/name_editText"
android:layout_width="match_parent"
android:layout_height="wrap_content"
android:importantForAutofill="no"
android:inputType="textMultiLine"
android:singleLine="true" />
</com.google.android.material.textfield.TextInputLayout>
</LinearLayout>
|
これで一応通るようになる。TextInputLayoutだけ使いたい!!!とかのときはTextInputLayoutの中にandroid:theme="@style/Theme.MaterialComponents"を書き足せば大丈夫です。
メリット
かんたん。TextInputLayoutだけ使いたいなんかはこれでいい気がする。
改善した方でもう満足した方はお疲れさまです。
解決策その2:styles.xmlを書き換える。
stack overflowなんかではこっちが多いね。でもこの方法は結構きつい。ちなみに私はこっちを使った。
なぜならアプリの外観を結構変えることになる。
書き換える場所はparentのところ。こうするparent="Theme.MaterialComponents.Light.DarkActionBar"。
以下例です。
1
2
3
4
5
6
7
|
<style name="AppTheme" parent="Theme.MaterialComponents.Light.DarkActionBar">
<item name="colorPrimary">@color/colorPrimary</item>
<item name="colorPrimaryDark">@color/colorPrimary</item>
<item name="colorAccent">@color/colorPrimaryDark</item>
</style>
|
どうでしょう。結構変わったと思いますよ?
で、ここからはTheme.MaterialComponentsとの戦いです。
Theme.MaterialComponents にして変わったところ。
良かったところ
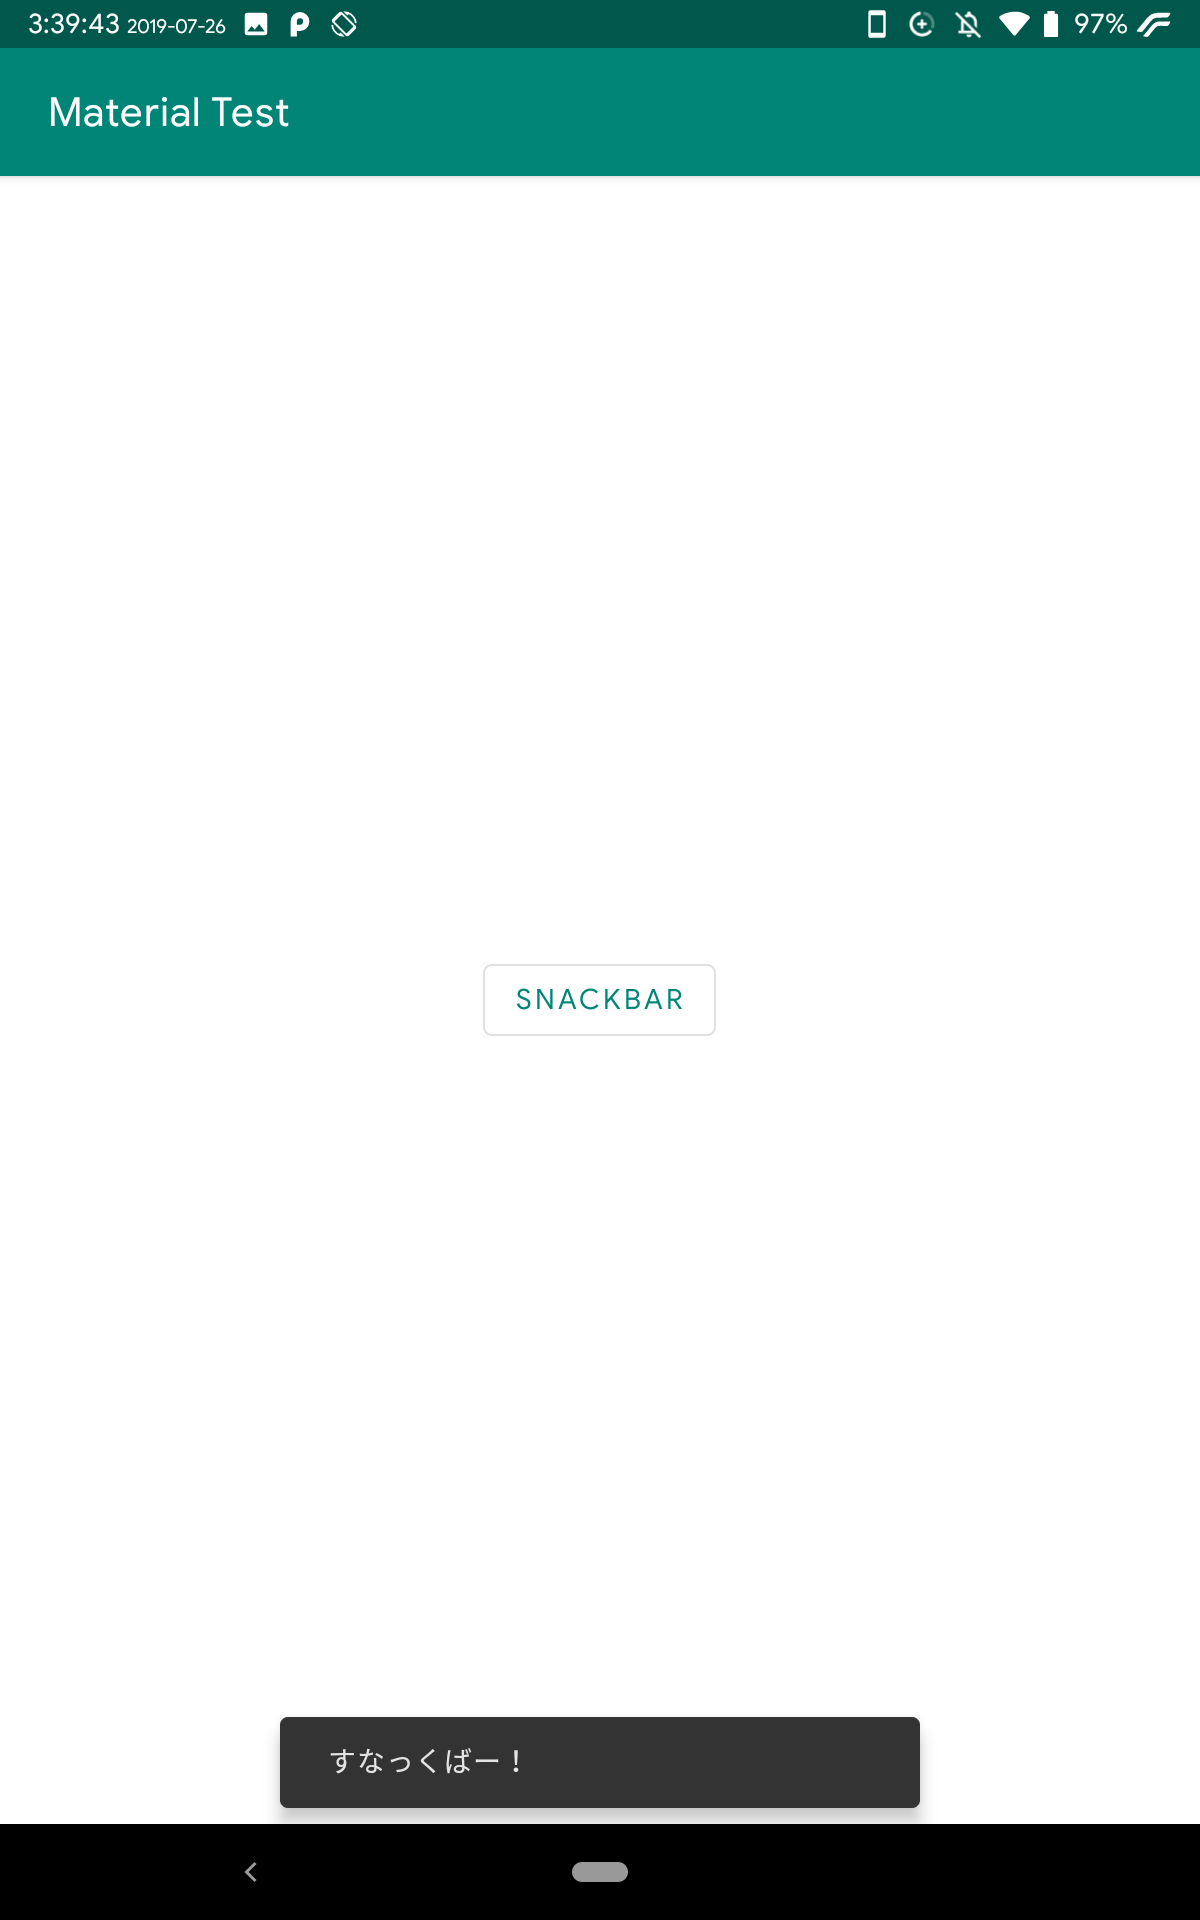
- Snackbarの表示方法が変わった
- 下からすーっと表示?→ふわっと表示?する感じに(自分で見たほうがはやい)
- スペースができるようになった。(下に空間ができるようになった)
Screenshot_20190726-033304_Material_Test.png
ほかにもあるかもだけど今回は時間無いので飛ばします。
直す必要があったところ
BottonにBackgroundが設定されてしまう問題の解決方法
参考
https://stackoverflow.com/questions/52743190/when-use-theme-materialcomponents-light-noactionbar-style-set-button-background
ButtonはButtonでもandroidx.appcompat.widget.AppCompatButtonに変えてあげれば解決です。
修正前
1
2
3
4
5
| <Button
android:layout_width="wrap_content"
android:text="snackbar"
android:id="@+id/snackbar_button"
android:layout_height="wrap_content"/>
|
修正後
1
2
3
4
5
| <androidx.appcompat.widget.AppCompatButton
android:layout_width="wrap_content"
android:text="snackbar"
android:id="@+id/snackbar_button"
android:layout_height="wrap_content"/>
|
ちなみに私はBackgroundにボタンの枠ができる用に設定してたんですけど・・
1
2
3
4
5
6
7
8
9
10
11
12
13
14
15
16
17
| を指定すれば枠がつくので私はstyleを書き足す形で対応しました。これだと押した時に波紋も出るのでいい感じ。
### AlertDialogのボタンがおかしくなる問題の解決方法
参考にしました。
https://stackoverflow.com/questions/52829954/materialcomponents-theme-alert-dialog-buttons
この様になってる場合は
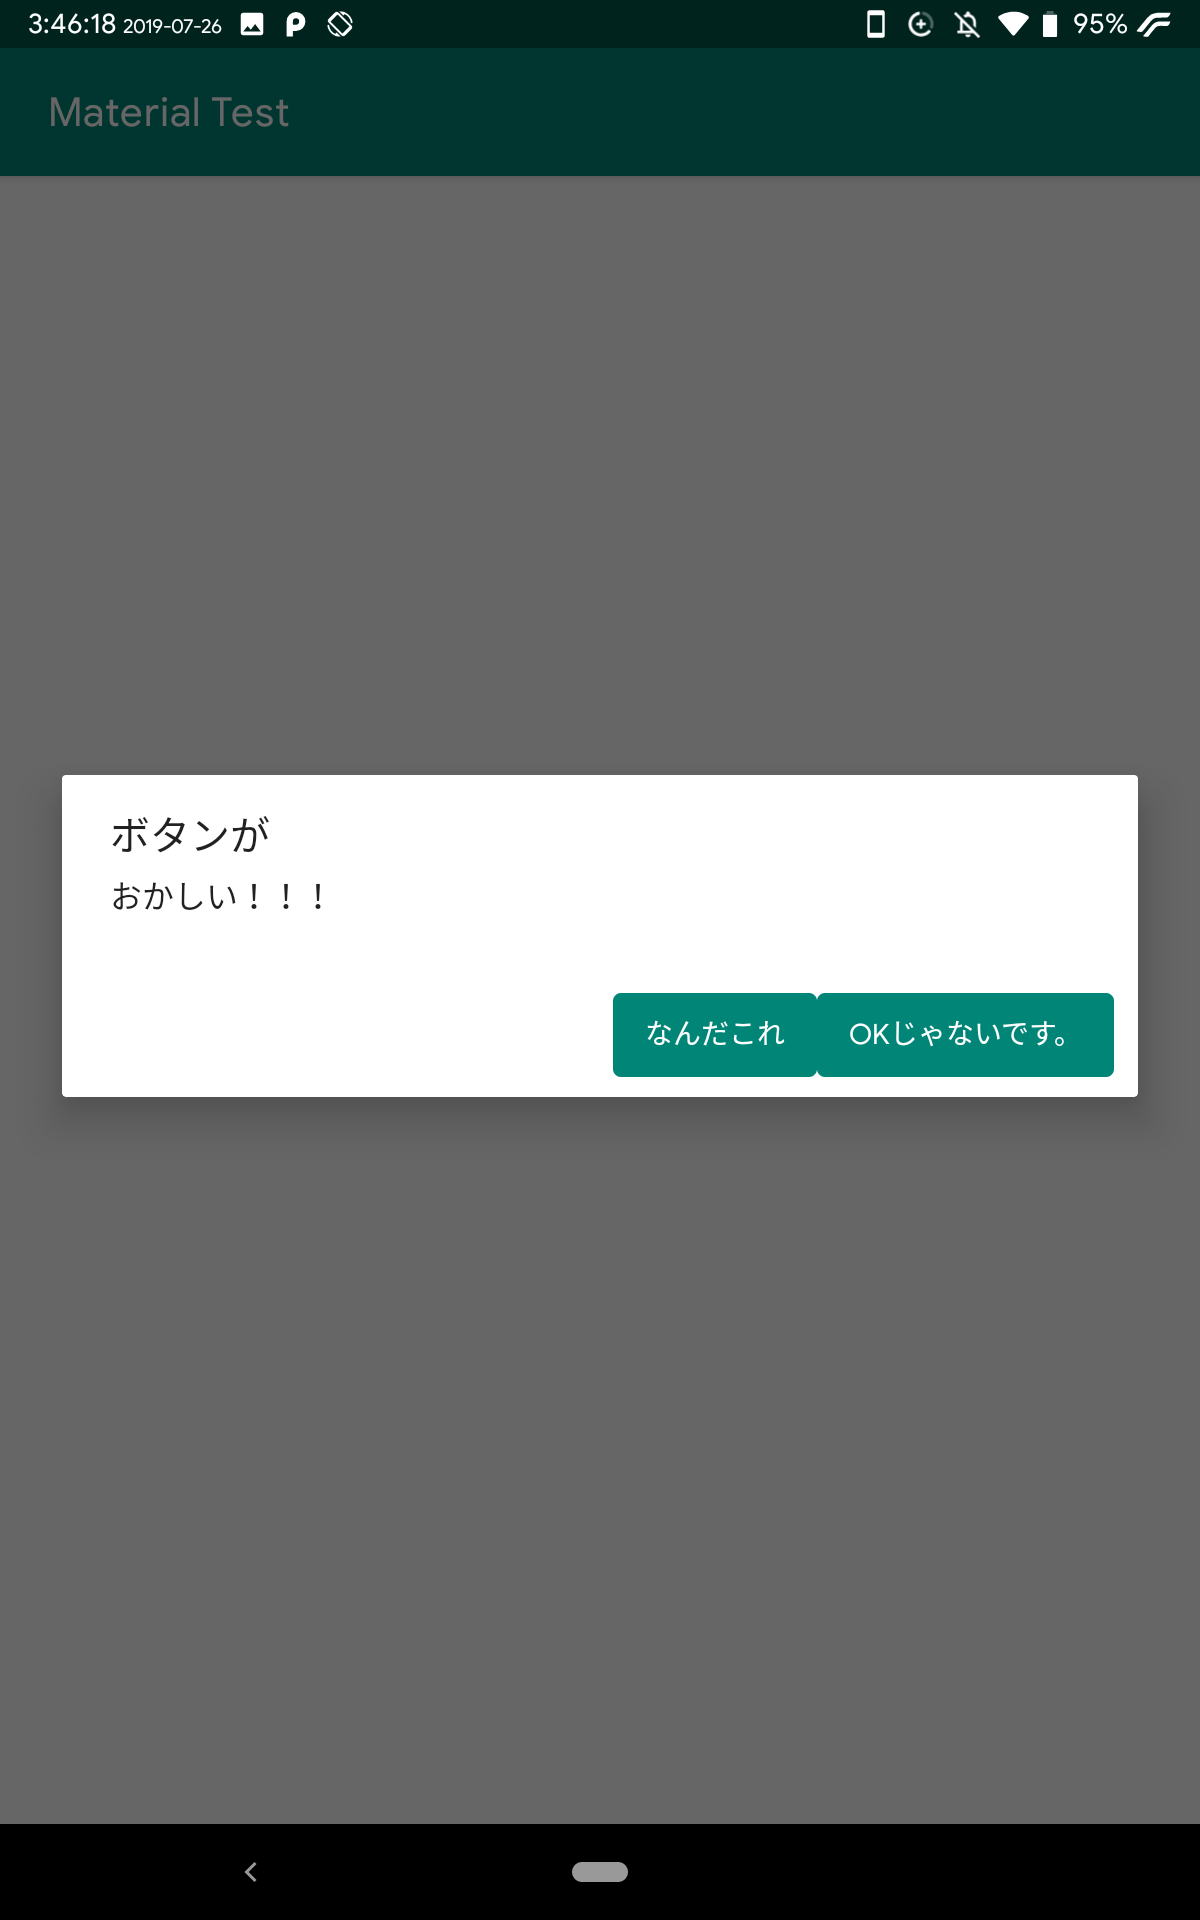
インポートの部分から```import android.app.AlertDialog```を見つけてきてそれを```import androidx.appcompat.app.AlertDialog```に書き換えれば直ります。
```kotlin
//import android.app.AlertDialog
import androidx.appcompat.app.AlertDialog
|
これで大丈夫そうですね。
Screenshot_20190726-035018_Material_Test.png
今のところはこんな感じですね。
お疲れさまです
最後に私のやりたかったFABの上にSnackbarを出すやり方を書いて終わろうと思います。
やり方は普通にSnackbarを作り、setAnchorViewのカッコの中にFABやSnackbarの下になるViewを入れてあげればおっけーです。
例です。
1
2
3
4
5
6
7
8
9
10
11
12
13
14
15
16
17
18
19
20
21
22
23
24
25
26
27
28
| class MainActivity : AppCompatActivity() {
override fun onCreate(savedInstanceState: Bundle?) {
super.onCreate(savedInstanceState)
setContentView(R.layout.activity_main)
snackbar_button.setOnClickListener {
Snackbar.make(findViewById(android.R.id.content), "すなっくばー!", Snackbar.LENGTH_LONG).show()
}
alert_dialog.setOnClickListener {
AlertDialog.Builder(this)
.setTitle("ボタンが")
.setMessage("おかしくない!!!")
.setPositiveButton("これでいい") { dialogInterface: DialogInterface, i: Int ->
}
.setNegativeButton("だいじょうぶ", null)
.show();
}
fab.setOnClickListener {
val snackbar = Snackbar.make(fab,"ボタンの上からこんにちは",Snackbar.LENGTH_LONG)
snackbar.anchorView = fab
snackbar.show()
}
}
}
|
レイアウト
1
2
3
4
5
6
7
8
9
10
11
12
13
14
15
16
17
18
19
20
21
22
23
24
25
26
27
28
29
30
31
32
33
34
35
36
37
38
39
40
| <?xml version="1.0" encoding="utf-8"?>
<androidx.coordinatorlayout.widget.CoordinatorLayout
xmlns:android="http://schemas.android.com/apk/res/android"
xmlns:tools="http://schemas.android.com/tools"
xmlns:app="http://schemas.android.com/apk/res-auto"
android:layout_width="match_parent"
android:layout_height="match_parent"
tools:context=".MainActivity">
<LinearLayout
android:layout_width="match_parent"
android:gravity="center"
android:layout_height="match_parent"
android:orientation="vertical">
<Button
style="@style/Widget.MaterialComponents.Button.OutlinedButton"
android:layout_width="wrap_content"
android:text="snackbar"
android:id="@+id/snackbar_button"
android:layout_height="wrap_content"/>
<Button
style="@style/Widget.MaterialComponents.Button.OutlinedButton"
android:layout_width="wrap_content"
android:text="AlertDialog"
android:id="@+id/alert_dialog"
android:layout_height="wrap_content"/>
</LinearLayout>
<com.google.android.material.floatingactionbutton.FloatingActionButton
android:id="@+id/fab"
android:layout_width="wrap_content"
android:layout_height="wrap_content"
android:layout_gravity="bottom|end"
android:layout_margin="16dp"
app:srcCompat="@drawable/ic_laptop_windows_black_24dp"/>
</androidx.coordinatorlayout.widget.CoordinatorLayout>
|
実行するとこんな感じ
Screenshot_20190726-035632_Material_Test.png
お疲れさまでした!
どうでもいいですが書いてる途中でサブ機の中古レッツノートくんがいきなりよくわからん画面になりましたが再起動したら直りました。


